

How to Install Homebrew on mac
Introduction
If you work with development tools on macOS, managing packages manually can quickly become inefficient. Homebrew is the de facto package manager for macOS, designed to simplify installing, updating, and managing software via the command line.
This guide provides a clean, professional, and optimized walkthrough for installing Homebrew on Mac, along with validation steps and troubleshooting.
What is Homebrew?
Homebrew is an open-source package manager that allows you to install software using simple terminal commands instead of downloading .dmg files manually.
Key Benefits:
- One-line installation for most tools
- Automatic dependency management
- Easy updates and cleanup
- Supports thousands of packages (Node.js, Git, Python, etc.)
Step-by-Step Installation
1. Open Terminal
Launch Terminal from:
Applications → Utilities → Terminal2. Install Xcode Command Line Tools
Run the following command:
xcode-select --installThis installs essential compilers and tools required by Homebrew.
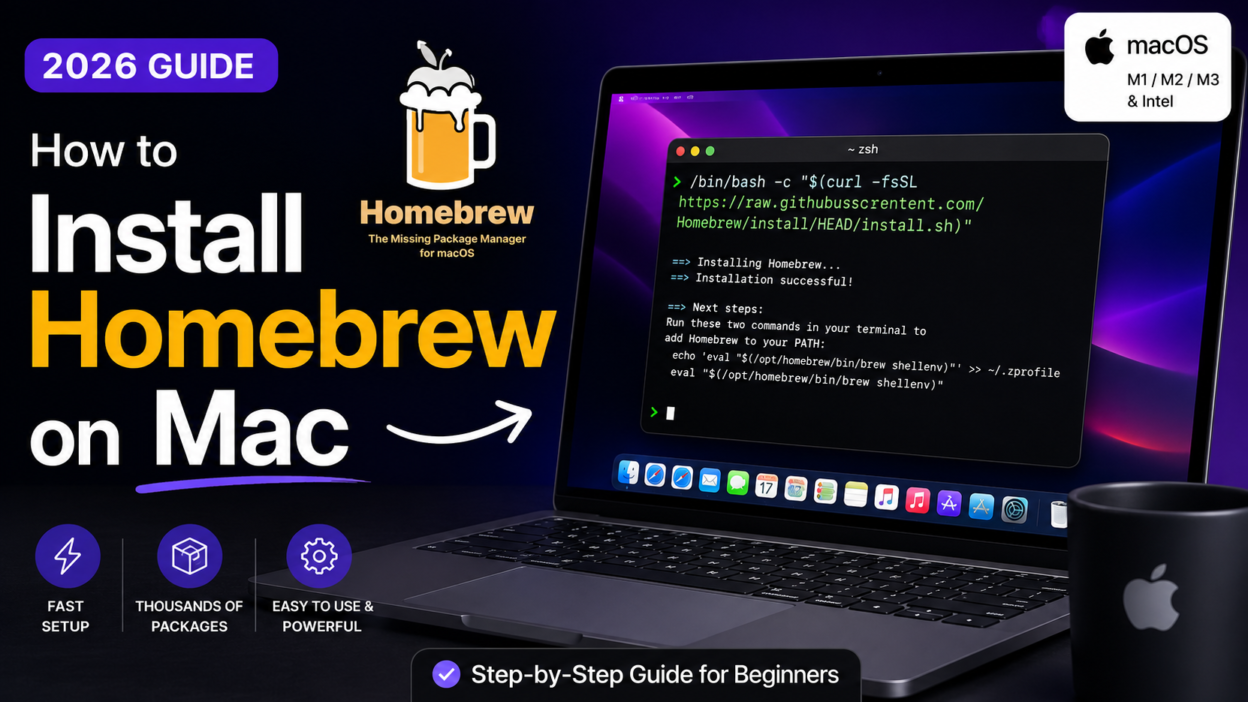
3. Install Homebrew
Run the official installation command:
/bin/bash -c "$(curl -fsSL https://raw.githubusercontent.com/Homebrew/install/HEAD/install.sh)"What Happens Here:
- Downloads the installation script securely
- Installs Homebrew in
/opt/homebrew(Apple Silicon) or/usr/local(Intel) - Configures system paths
4. Add Homebrew to PATH
After installation, configure your shell environment.
For Apple Silicon (M1/M2/M3):
echo 'eval "$(/opt/homebrew/bin/brew shellenv)"' >> ~/.zprofile
eval "$(/opt/homebrew/bin/brew shellenv)"
For Intel Macs:
echo 'eval "$(/usr/local/bin/brew shellenv)"' >> ~/.zprofile
eval "$(/usr/local/bin/brew shellenv)"
5. Verify Installation
Check if Homebrew is installed correctly:
brew --versionExpected output:
Homebrew X.X.XBasic Homebrew Commands
Once installed, you can start using Homebrew immediately.
Install a package:
brew install gitSearch for packages:
brew search nodeUpdate Homebrew:
brew updateUpgrade installed packages:
brew upgradeUninstall a package:
brew uninstall gitCommon Issues & Fixes
1. Permission Errors
Run:
sudo chown -R $(whoami) /usr/local/*(Intel Macs only)
2. Command Not Found: brew
This usually means PATH is not set correctly. Re-run the PATH setup step.
3. Slow Installation
- Check internet connection
- Try switching network or using a faster DNS
Why Developers Prefer Homebrew
- Standard tool across macOS dev environments
- Saves time on setup and maintenance
- Works seamlessly with tools like Node.js, Python, Docker, etc.
Conclusion
Installing Homebrew on macOS is a one-time setup that significantly improves productivity. It eliminates manual installation workflows and provides a scalable way to manage development tools efficiently.
For any developer, designer, or power user, Homebrew is not optional—it’s foundational.